ParaView:AnimationTutorial
OBSOLETE: This refers to ParaView 2.* and is not applicable for ParaView 3+.
The Parameters tab on the property sheet for any source or sphere shows the parameters of the source/filter than can changed. The Display tab shows properties that affect the rendering of the data. In ParaView, an animation can be created by changing some of these parameters or display properties for the sources/filters over time. Thus, creation/deletion of sources/filters cannot be included in an animation.
The Interface
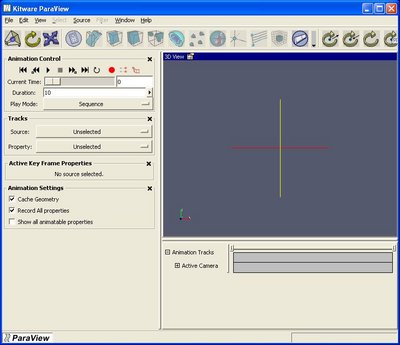
The Keyframe Animation Interface has two panels: the Animation Panel shown on the left panel and the Track Editor shown on the bottom panel. Selecting View | Keyframe Animation shows the Animation Panel, while selecting Window | Show Bottom Panel shows the Track Editor. All animation settings can be adjusted using the Animation Panel alone. The Track Editor provides an interface to easily create/delete/adjust individual keyframes; however, all this can also be done using the Animation Panel.
Animation Panel
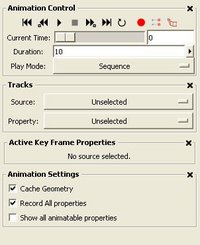
Animation Control
The Animation Control can be used to control running of the animation.
The VCR-like buttons in the control can be used to play/stop the animation or change the current time.
- : Go to the beginning of the animation.
- : Go to the previous frame in the animation.
- : Play the animation.
- : Stop playing the animation.
- : Go to the next frame in the animation.
- : Go to the last frame in the animation.
- : When pressed, the animation is played in a loop.
- : Record an animation.
- : Record current state for animation.
- : Save animation as a movie/images.
The current time can also be changed by using the Current Time slider.
The animation can be played in two modes: Sequence mode and Real Time mode. The mode can be changed by selecting the appropriate mode in the Play Mode selection list. In Sequence mode, the animation is played as a sequence of images(or frames) generated one after the other rendered in immediate succession. The number of frames is controlled by the Duration entry. Note that the frames are rendered as fast as possible. Thus the viewing frame rate depends on the time needed to generate and render each frame. In Real Time mode, the Duration entry indicates the time in seconds for which the animation should be run. Each frame is rendered using the current wallclock time in seconds relative to the start time. The animation runs for exactly duration seconds. The number of frame actually generated/rendered in turn depends on the time for to generate/render each frame.
Tracks
The animation sequence for every source (or filter) and all the properties of the source that can be animated are called Tracks. The user creates keyframes in a track for a particular property of a given source. The values of the keyframes (and the keyframe interpolation type) control how the property value is modified over time, when the animation is played. The Tracks widget provides a means to select a particular track for editing. Tracks can also be edited using the Track Editor (discussed later).
All created sources (or filters) are listed in the Source menu. Once a source (or filter) is choosen, all the available properties of the selected source (or filter) that can be animated are listed in the Property menu. Both Source and Property must be selected to edit the keyframes.
Active Key Frame Properties
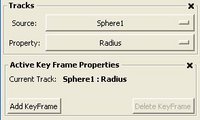
This frame shows the properties of the selected (or active) key frame in the choosen Track. If the track has no keyframes added to it, we see a GUI as under.
The Add KeyFrame Delete KeyFrame buttons can be used to add and delete active keyframe from the track. When the Add KeyFrame button is pressed on track with no keyframes, two keyframes are added. The first keyframe is called the anchor. The Anchor cannot be moved, it has to be at time 0, and cannot be deleted unless it's the only keyframe on the track.
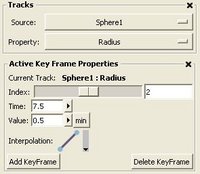
Following figure shows a track with 3 key frames.
The different keyframe on the track can be selected using the Index slider. Time entry is used to change the time at which the key frame takes effect. The Interpolation control how the value is interpolated once the key frame take effect (i.e. current time >= key time) until the immediately following keyframe takes effect. Consequently, interpolation for the last keyframe has no effect and is disabled. The Value widget depends on the type of the property being animated by the current track. Min and/or Max buttons become available next to the Value widget if the property being animated has min and/or max bounds.
Animation Settings
Cache Geometry check enables/disables if caching is to be used while playing the animation. Note that caching has any effect only when playing in Sequence mode. When enabled, the geometry is cached and used whenever available which playing the animation.
Record All properties controls when recording an animation (explained later), if all property changes are recorded or only those in the property controlled by the Current Track.
Show all animatable properties: to minimize the tracks shown in the track editor, when this check is off, a small subset of the tracks are visible in the Track Editor. When enabled, tracks for all animatable properties are shown. As of 2.2, this does not affect the source/properties shown in Source Property menus, only the tracks shown in the Track Editor.
Track Editor
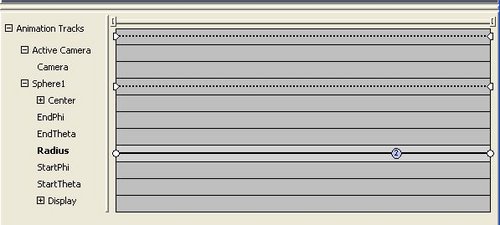
The Track Editor provides a GUI to edit/adjust keyframe in tracks. The tree on the leff-hand side of the Track Editor lists the name of the source/filter or its property which the track adjacent to it animates. Thus the track adjacent to Sphere1 | Radius is track for animating raduis of source with name Sphere1.
To animate a property, first locate the property by expanding/collapsing the tree. Once the appropriate property is located, simply left-click on the track adjacent to it. A key frame will be added at that location. If this is the first keyframe in the track, an anchor keyframe may also get added. A keyframe is shown as a bubble on the tracks. A key frame can be selected by clicking on the bubble. The selected keyframe's properties are shown in the Active Key Frame Properties frame on the Animation Panel. The keyframe time (i.e. the time at which the keyframe takes effect) can be changed by clicking and dragging the keyframe horizontally. To delete a keyframe, click-and-drag is outside the horizontal interface. Note that the anchor keyframe can be deleted only if it is the only key frame in the track.
All tracks adjacent to leaf labels in the tree represent animatable property tracks to which keyframes can be added. The tracks adjacnet to non-leaf labels are used for grouping the tracks for all its children. No key frames can be added to such tracks. However anchor tags get added to such tracks when keyframes are added to any of its children. When the anchor tracks are moved, the key times of for the keyframes of all its children are scaled to match the anchor tags.
The widget at the top of the tracks, adjacent to the label Animation Tracks can be used for horizontal-zooming of the tracks. Move the ends of the widget to change the zoom and move the widget horizontally to adjust the visible section of the tracks.
The Track Editor also provides a quick way of changing the current time. Simple right-click (or right-click-and-drag) in the tracks. A vertical current time marker will appear. The current time will be updated when the mouse button is released.
Tutorials
Each example assumes that you begin with a fresh paraview (i.e. newly started paraview), otherwise, the source names etc may be different.
Animating a dataset with timesteps
- Start ParaView.
- Select File | Open Data. Open ParaView File dialog will pop-up in which you can choose the dataset to load. Open multicomb_0.vts from the sample datasets provided.
- The dataset information will be loaded and the Accept button will get green. We choose the default options, hence, just click Accept, and the dataset will to loaded. The Selection Window shows the loaded dataset as a source with label multicomb_0.vts.
- Select Filter | Contour to create a contour filter. Hit Accept, and the filter will be applied with a single iso-surface at
- Enable the Animation Toolbar, if not already visible from Window | Toolbars | Animation.
- Once the Animation Toolbar is made visible, it will appear under the 3D View window.
- Click Window | Show Botton Panel (or F6) and the Animation Tracks window will be visible. You'll notice that there are already some animation keyframes added.
- Click on the + adjacent to multicomb_0.vts to open the tracks for the dataset source. ParaView added keyframes automatically when a dataset with timesteps is loaded to animate over the dataset with changing time. It also changes the duration of the animation to match the number of timesteps in the dataset, so that when playing in Sequence mode, each frame will show a new timestep in the dataset. The multicomb dataset has 3 timesteps. Select View | Keyframe Animation to open up the Animation Panel and verify that the Animation Control shows the duration to be 2.
- Change Current Time to 1 (or hit Go to next Frame button on the VCR control).
- You'll see the outline for the data at timestep 1.
- Use the VCR control to play the animation.
- Click on the keyframes in the multicomb_0.vts | FileName track to see the properties of the keyframes. Notice that the value for the keyframes is shown as a selection list with the filenames for each timestep.
Using Record Animation to animate contours
- Follow the steps 1-5 from Animating a dataset with timesteps.
- Hide the Animation Tracks, if they are visible.
- Select Edit | Delete All Keyframes. If a confirmation dialog appears, select yes. This will remove the default animation added when the dataset was loaded i.e. it will remove all the keyframes currently in the animation.
- Hit the Start/Stop Recording button on the Animation Toolbar. This begins the recording. ParaView starts monitoring the changes that you make to the source/filter properties. All the accepted changes will get keyframed on clicking Record a frame button.
- Select Select|Coutour0 to show the properties page for the Coutour filter.
- Delete All contour values.
- Using the Add Value widget, add two new iso-surface values: 0.25 and 0.59 in that order.
- Hit Accept.
- Now click Record a frame button on the VCR control. This will record the changes to contour values in a keyframe.
- Delete All contour values again and add three new iso-surface values: 0.2, 0.57 and 0.71. And hit Accept.
- Move the camera to a suitable view.
- Click Record a frame button again. This will record the changes to contour values and also the camera in a keyframe.
- Click Start/Stop Recording button again to stop recording.
- In the Animation Panel (select View | Keyframe Animation) change the Duration to 100.
- Move the Current Time slider to 0 (it is not already at 0) and hit Play
