Immersive ParaView
Overview
- Configure and build ParaView with the VR plugin enabled.
- Configuring the server display specification (.pvx file).
- Setup connections to input event streams.
- Launch pvserver.
For further reading, the following articles in The Kitware Source detail the VR plugin:
Build ParaView
Note: For distributed Windows environments, alternate instructions are available for building with VRPN and Microsoft MPI here: ParaView/VRPN with MS-MPI
Follow regular build instructions from http://paraview.org/Wiki/ParaView:Build_And_Install. In addition following steps needs to be performed:
- Install Qt (client) and MPI (client and server) as they are ParaView dependencies. If using VRPN to generate VR input events, make sure that it is built and installed as well.
- When configuring cmake enable
BUILD_SHARED_LIB, PARAVIEW_BUILD_QT_GUI, PARAVIEW_USE_MPIandPARAVIEW_BUILD_PLUGIN_VRPlugin. - Enable
PARAVIEW_USE_VRPNorPARAVIEW_USE_VRUI(Apple/Linux only) depending on input event source you wish to use.- If VRPN support is enabled and the library is not installed in the default paths then
VRPN_INCLUDE_DIRandVRPN_LIBRARYmay also need be set.
- If VRPN support is enabled and the library is not installed in the default paths then
Configuring Displays
The ParaView server is responsible for configuring displays. The display configuration is stored on a ".pvx" file.
ParaView has no concept of units and therefore user have to make sure that the configuration values are in the same measurements units as what tracker has producing. So for example if tracker data is in meters, then everything is considered in meters, if feet then feet becomes the unit for configuration.
Structure of PVX Config File
<source lang="xml"> <?xml version="1.0" ?> <pvx>
 <Process Type="server|dataserver|renderserver">
   <EyeSeparation Value="0.065"/>
   <Machine Name="hostname"
            Environment="DISPLAY=:0"
            Geometry="1920x1080+0+0"
            FullScreen="0"
            ShowBorders="0"
            LowerLeft="-1.0 -1.0 -1.0"
            LowerRight="1.0 -1.0 -1.0"
            UpperRight="1.0  1.0 -1.0">
   </Machine>
 </Process>
</pvx> </source>
Example Config.pvx
- The following example is for a six sided cave with origin at (0,0,0):
<source lang="xml"> <?xml version="1.0" ?> <pvx>
<Process Type="client" />
<Process Type="server">
<EyeSeparation Value="0.065"/>
 <Machine Name="Front"
          Environment="DISPLAY=:0"
          FullScreen="1"
          ShowBorders="0"
          LowerLeft=" -1 -1 -1"
          LowerRight=" 1 -1 -1"
          UpperRight=" 1  1 -1" />
 <Machine Name="Right"
          Environment="DISPLAY=:0"
          FullScreen="1"
          ShowBorders="0"
          LowerLeft="  1 -1 -1"
          LowerRight=" 1 -1  1"
          UpperRight=" 1  1  1" />
 <Machine Name="Left"
          Environment="DISPLAY=:0"
          FullScreen="1"
          ShowBorders="0"
          LowerLeft=" -1 -1  1"
          LowerRight="-1 -1 -1"
          UpperRight="-1  1 -1"/>
 <Machine Name="Top"
          Environment="DISPLAY=:0"
          FullScreen="1"
          ShowBorders="0"
          LowerLeft=" -1  1 -1"
          LowerRight=" 1  1 -1"
          UpperRight=" 1  1  1"/>
 <Machine Name="Bottom"
          Environment="DISPLAY=:0"
          FullScreen="1"
          ShowBorders="0"
          LowerLeft=" -1 -1  1"
          LowerRight=" 1 -1  1"
          UpperRight=" 1 -1 -1"/>
 <Machine Name="Back"
          Environment="DISPLAY=:0"
          FullScreen="1"
          ShowBorders="0"
          LowerLeft="  1 -1  1"
          LowerRight="-1 -1  1"
          UpperRight="-1  1  1"/>
 </Process>
</pvx> </source>
- A sample PVX is provided in ParaView/Documentation/cave.pvx. This can be used to play with different display configurations.
Notes on PVX file usage
- PVX file should be specified as the last command line argument of the server processes.
- The PVX file is typically specified for all the executables configured in it. In case of data-server/render-server configuration, if you are setting up the environment for the two processes groups, then the PVX file must be passed as a command line option to both the executables: pvdataserver and pvrenderserver.
- When running in parallel the file is read on all nodes; hence it must be present on all nodes.
- ParaView has no concept of units.
- Use tracker units as default unit for corner points values, eye separation and anything else that requires real world units.
Configure Input Connections
This section details the specification of VRPN or VRUI connections using the ParaView VR plugin's user interface.
Loading the VR plugin in ParaView
- Start the ParaView application.
- Load the VR plugin:
- Tools >> Manage Plugins...
- Select "VRPlugin", click "Load Selected".
- If the "VR Panel" shown below does not appear, show it by checking View >> VR Panel.


Add a New Connection
- Click "Add" under "VR Connections".
- VRPN:
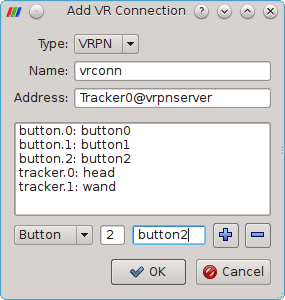
- Select "VRPN" as the connection type.
- Enter a name for the connection.
- Specify the address of the VRPN server in the form "<device>@<hostname/IP>".
- Add inputs by specifying their type (tracker, button, or analog), id #, and a unique identifier, then clicking the "+" icon. The identifier should be descriptive as it will be used when configuring interactions later.
- VRUI:
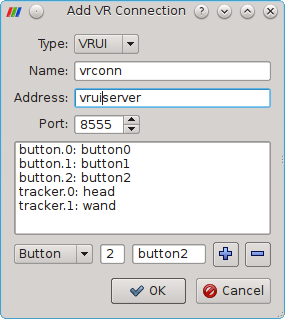
- Select "VRUI" as the connection type.
- Enter a name for the connection.
- Specify the hostname or IP address of the VRUI server.
- Specify the port that the VRUI server is using.
- Add inputs by specifying their type (tracker, button, or analog), id #, and a unique identifier, then clicking the "+" icon. The identifier should be descriptive as it will be used when configuring interactions later.
- Click OK


Configure Interactions
- In the "Interactions" section of the VR Panel, configure the interation you would like to add by selecting values from the drop-down boxes. These boxes allow selection of an object, a property of that object, and an interaction style. Common combinations are:
- Track styles use a RenderView object and Eye Transform Matrix property.
- Grab styles use a RenderView object and Model Transform Matrix property.
- Slice Position styles use a Slice object filter and "Slice Type - Origin" property.
- Slice Orientation styles use a Slice filter object and "Slice Type - Normal" property.
- Click "Add" once the desired style, object, and property are displayed.
- A window will appear, displaying the various inputs needed by the interaction style. Select the input corresponding to each action using the connection and input name defined earlier.
- Example -- Grab Style:
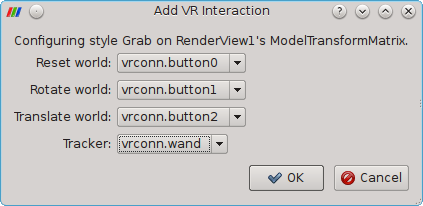
- Example -- Grab Style:
- Click Ok

Saving/Restoring VR Plugin Configurations
The Save/Resume buttons at the bottom of the VR configuration panel can be used to write the current plugin state to a file, which can later be applied to an existing session. The file is of the format:
<source lang="xml"> <VRPluginState>
 <VRConnectionManager>
   <VRPNConnection name="vrpnConnection" address="Tracker0@localhost">
     <Button id="0" name="b0"/>
     <Button id="1" name="b1"/>
     <Button id="2" name="b2"/>
     <Tracker id="0" name="head"/>
     <Tracker id="1" name="wand"/>
     <TrackerTransform value="
       1  0  0  0
       0  0 -1  1.524
       0  1  0  0
       0  0  0  1"/>
   </VRPNConnection>
 </VRConnectionManager>
 <VRInteractorStyles>
   <Style class="vtkVRTrackStyle" proxyName="RenderView1" proxy="2300" property="EyeTransformMatrix">
     <Tracker role="Tracker" name="vrpnConnection.head"/>
   </Style>
   <Style class="vtkVRGrabWorldStyle" proxyName="RenderView1" proxy="2300" property="ModelTransformMatrix">
     <Button role="Reset world" name="vrpnConnection.b0"/>
     <Button role="Rotate world" name="vrpnConnection.b1"/>
     <Button role="Translate world" name="vrpnConnection.b2"/>
     <Tracker role="Tracker" name="vrpnConnection.wand"/>
   </Style>
 </VRInteractorStyles>
</VRPluginState> </source>
Note: the TrackerTransform entry is used to apply a transformation to all incoming tracker data for a given connection. It is not currently configurable through the GUI, and must be added manually if needed.
Start monitoring events
Ensure that the VRPN/VRUI server is running, and click "Start" to begin listening for events. The configured objects should respond to input events as specified.
Saving/Restoring Configurations
VR configurations is written into the ParaView state file. It is recommended that the VR connections and interactions are initially configured in a clean ParaView instances, and then the state is saved. To use the configuration, load the state file with the VR configuration and setup the visualization as usual.