|
|
| Line 83: |
Line 83: |
| |} | | |} |
|
| |
|
| == 3) Create armature == | | == 3) Create armature (rigging) == |
| {| width="100%" | | {| width="100%" |
| | valign="top"| | | | valign="top"| |
Revision as of 14:57, 20 March 2013
Introduction
This module guides the user step-by-step into transforming a volume using a rigging, skinning and posing technique.
Details
Author: Julien Finet, Kitware
Contributor #1: Johan Andruejol, Kitware
Acknowledgements: This work is supported by the Air Force Research Laboratories.
Contact: Julien Finet
Use Cases
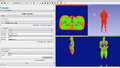
2mm labelmap volume loaded in workflow
Bone and Skin surfaces extracted from 2mm labelmap volume
Parameters
Advanced properties
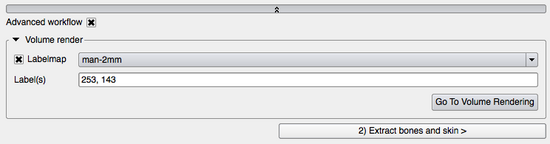
Volume Render
- Labelmap: Select the volume/labelmap you want to render. The checkbox next to labelmap controls whether the rendering is done.
- Label(s): Specify the label(s) that will be rendered.
- Go To Volume Rendering: Opens the Volume Renderer menu. Read here the documentation on this module.
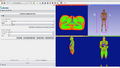
|
 Advanced properties panel |
1) Adjust Labelmap
A) Labelmap
Simple workflow
- Volume: Select the volume/labelmap that you want to reposition. Read here the instructions to load data into Bender.
- Colors: Select the color transfer function to apply to the volume . It will The transfer function is used to
- Apply: Set the color transfer function to the volume.
- LPS<->RAS: Apply a (-1,-1, 1) transform to the volume. It can be used to apply the same coordinate system used by Bender to the volume. The "R,L,A,P,S,I" letters on the purple box in the 3D view represent the orientations "Right, Left, Anterior, Posterior, Superior, Inferior".
Advanced workflow
- Go To Volumes: Go to the Volumes module to read volume information (such as its size, origin, spacing, scalar type, range...) and display properties (window/level, threshold, interpolation...)
B) Merge labels
Simple workflow
- Output Labelmap: Select the labelmap for which the labels will be merged together.
- Merge labels: Merge the Bone Label(s) and Skin Label(s) from Input Labelmap (into respectively Bone Label and Skin Label) and outputs the result in Output Labelmap.
Advanced workflow
- Input Labelmap: Select the labelmap that needs label to be merge together. Set by default to the selected volume in A) Labelmap.
- Bone label(s): Choose the label(s) that will be merge into the Bone Label. They are automatically computed based on the input volume color table by looking for names containing "bone" and "vertebrae" in it.
- Bone label: Select the new label value of the Bone Label(s).
- Skin label(s): Choose the label(s) that will be merge into the Skin Label. They are automatically computed based on the input volume color table by looking for names containing "skin" in it.
- Bone label: Select the new label value of the Skin Label(s).
- Go To Change Label: Opens the Change Label CLI.
|
|
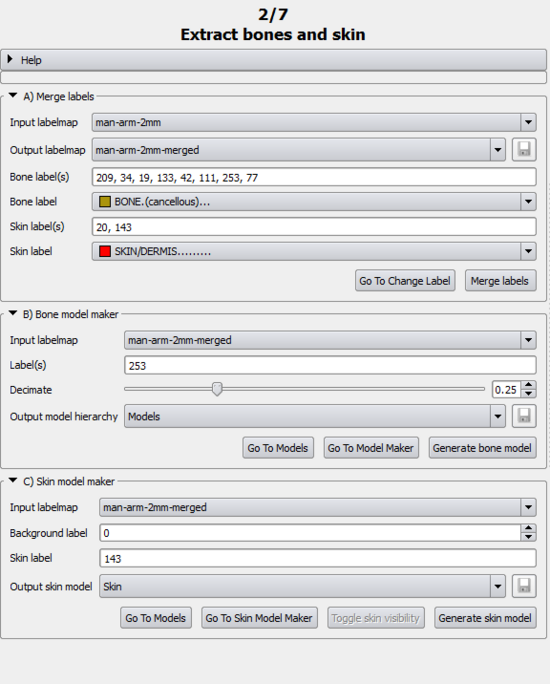
2) Extract Bone and Skin
A) Bone Model Maker
Simple workflow
- Output model hierarchy: Select the output model hierarchy under which the bone model will be stored.
- Generate bone model: Using the Model Maker, generate the bone model.
Advanced workflow
- Label(s): Select the label that will be used to create the bone model. By default, it automatically uses the label from Bone Label (in 1) A)).
- Go To Models: Opens the Models module.
- Go To Model Maker: Opens the Models module.
B) Skin model maker
Simple workflow
- Output: Select the output model for the skin model.
- Toggle skin visibility: Toggle the visibility of the model selected in Output.
- Generate skin model: Using the Grayscale Model Maker, extract the outer surface of the Input Labelmap.
Advanced workflow
- Input Labelmap: Select the labelmap that will be used to create the skin model.
- Threshold: Select the threshold that will be used to differentiate the body in the labelmap from the outside (usually air). Default is 0.1.
- Go To Models: Opens the Models module.
- Go To Grayscale Model Maker:Opens the Grayscale Model Maker module.
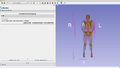
|
 Extract bone and skin panel |
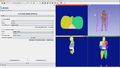
3) Create armature (rigging)
A) Armatures
When Opening this page, the view will automatically switch to 3D Only.
Simple workflow
- Toggle Skin visibility: Does the same as Toggle Skin Visibility in 2) B). It is advised to turn off the skin visibility so when placing bone, they automatically will drop at the same depth as the skeleton model instead of the skin model.
- Load armature from model: Prompts a dialog window to open an armature from a model. See Armature Module for further details.
- Go To Armature Module: Opens the Armature Module.
|
|
4) Compute weight
5) Pose armature
6) Pose labelmap
Developer Information