ParaView/Users Guide/Calculator
Basics
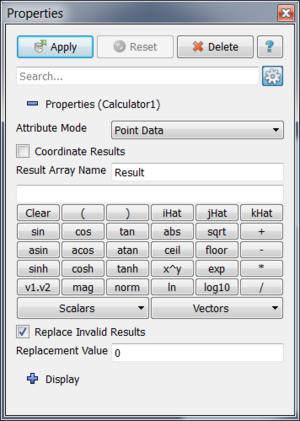
The Calculator Filter can be use to calculate derived quantities from existing attributes. The main parameter of the Calculator is an expression that describes how to calculate the derived quantity. You can enter this expression as free-form text or using some of the shortcuts (buttons and menus provided). Here we describe various options available within the Calculator.
Note: We recommend that you use the Python Calculator instead of Calculator if possible. The Python Calculator is more flexible, has more functions and is more efficient. However, it requires that ParaView is compiled with Python support and that NumPy is installed.
Let's start with a simple example. Create a Wavelet source and then apply the Calculator using "1" as the expression. Note: You can enter an expression by clicking in the expression entry box and typing. This should create an point array called "Result" in the output. A few things to note:
- The Calculator copies the input mesh to the output. It is possible to have the calculator to change the point coordinates. We will discuss this later.
- The expression is calculated for each element in the output point or cell data (depending on the Attribute Mode).
Next, change the expression to be "5 * RTData" and the Result Array Name to be "5 times rtdata" (without the quotes). If you change to surface representation and color by the new array, you will notice that the filter calculated "5 * RTData" at each point.
The main use case for the Calculator is to utilize one or more input arrays to calculate derived quantities. The Calculator can either work on point centered attributes or cell centered attributes (but not both). In order to help enter the names of the input arrays, the Calculator provides two menus accessible through the "Scalars" and "Vectors" buttons. If you select an array name from either menus, it will be inserted to the expression entry box at the cursor location. You can also use the other buttons to enter any of the functions available to the Calculator. Most of these functions are obvious. We will cover the ones that are not below.
Working with Vectors
Let's start with an example. Create a Wavelet source then apply the Random Vectors filter. Next, apply the Calculator. Now look at the Scalars and Vectors menus on the Object Inspector panel. You will notice that BrownianVectors shows up under Vectors, whereas BrownianVectors_X, _Y and _Z show up under scalars. The Calculator allows access to individual components of vectors using this naming convention. So if we use BrownianVectors_X as the expression, the Calculator will extract the first component of the BrownianVectors attribute. All of the Calculator's functions are applicable to vectors. Most of these functions treat the vector attributes same as scalars, mainly apply the same functions to all components of all elements. However, the following functions work only on vectors:
- v1 . v2 : Dot product of two vectors. Returns a scalar.
- norm : Creates a new array which contains normalized versions of the input vectors.
- mag : Returns the magnitude of input vectors.
You may have noticed that 4 calculator buttons on the Object Inspector are not actually functions. Clear is straightforward. It cleans the expression entry box. iHat, jHat and kHat on the other hand are not as clear. These represent unit vectors in X, Y and Z directions. They can be used to construct vectors from scalars. Let's consider a simple but common use case. We want to set the Z component of BrownianVectors from the previous example to 0. The expression to do that is "BrownianVectors_X *iHat+BrownianVectors_Y*jHat+0*kHat". This expression multiplies the X unit vector with the X component of the input vector, the Y unit vector with the Y component, and the Z unit vector with 0 and add them together. You can use this sort of expression to create vectors from individual components of a vector if the reader loaded them separately, for example. Note: We didn't really need the 0*kHat bit. It was for demonstration.
