ParaViewWeb Design
Introduction
ParaViewWeb is a collection of reusable components. Those component range from server side to client side. On the server side, the visualization server (PWServer) is a ParaView-based engine that does the actual visualization. It can connect itself to a remote ParaView processing server (PVServer) which could run over a cluster with MPI. Then, the web service component named PWService manages communication between remote visualization servers (PWServer) and clients. It includes also administration web pages allowing to monitor running visualization session as well as browsing logs and informations of the previous ones. On the client side, a JavaScript library is provided for creating remote visualizations and managing them as well as several visualization components allowing users to look at 3D content in the browser interactively. Using these components, developers can build websites or web portals with visualization and data processing capabilities. These components can be easily integrated into Rich Internet Applications (RIAs) developed using popular web designing infrastructures including qooxdoo, Dojo, Google Web Toolkit, jQuery, Flex, Java and other. Figure below gives a schematic of the various components involved. Our implementation requires any supporting Java-based Web Application server which includes Apache Tomcat, an open source, freely available implementation.
Data processing layer
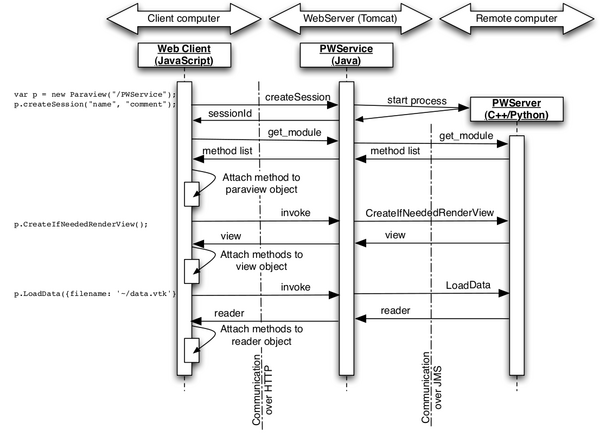
First of all, we will start from the browser side with a very simple JavaScript code making a new visualization session and loading a data file as well as creating a render view on the server side. The figure below give a sequential diagram of all the step and components involved in that initialization process. Lets get through it step by step.
Once a ParaView object has been created in the JavaScript side, the user can create or join a visualization session. If the user requests a new visualization session, then on the server side a new process is launched in order to handle all the data processing commands related to that session. Each visualization session, have a unique identifier which is sent back and kept inside the ParaView object. This identifier is needed to join another running visualization session or bind a client renderer. As a visualization session has been created, the ParaView instance make an internal call in order to get the list of methods available on the ParaView object. Based on that list, it dynamically extends itself with those methods in order to make remote calls when those methods are locally called. Moreover, when new objects are created on the server side like a view or a reader, the server send a proxy object to the client with all the properties that can be retrieved or set to it. Once the proxy is received in the JavaScript layer, the corresponding object is filled with a set of methods for getting and setting those properties and make the corresponding remote call when used. All the networking is managed with a JSON-RPC client which is embedded inside the ParaView object. Based on this dynamic object building with RPC calls, we can easily extends ParaView API by writing server side plugins in Python. In fact, those plugin are loaded at runtime and on demand for each visualization session and can be used as any other ParaView objects. For example, if we want to do some JavaScript data analysis, it becomes easy to write a plugin that will be used to convert server data structure into a JavaScript one that can be retrieved and managed locally.
Rendering layer
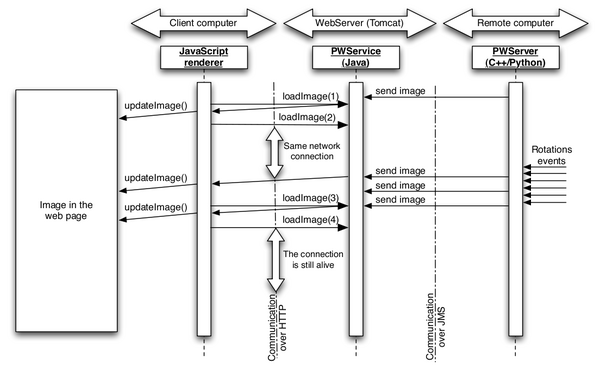
The rendering is an important part of 3D visualization and with ParaViewWeb, we do provides several rendering component to the web designer. The first one is a Java Applet which rely on a Java plugin, a second one is a Flex component which using the flash player and the third one is fully written in JavaScript. We will focus our explanations on the latest one which also work on iPhone and iPad for 3D rendering and scene interaction. The figure below give a sequential diagram on how the rendering is done through the whole component chains.
The JavaScript renderer is a JavaScript object which should be instantiate by the user and linked to a running session by using the identifier of the session and the view. Then a DOM element should be given as a container in order to place the rendering image into the page content. Once started, the renderer will work on the background in order to update the local image with new ones as soon as they have been generated on the server. But what is happening under the hood, is that a background JavaScript image is used to pre-load the next image into the browser cache and once this one get loaded, the browser switch the current image with the new one in the same manner as a double buffering technique will do. In order to prevent networking overload when no new images are available on the server side, the network connection is locked by the server till a new image corresponding to its session and view has been generated. Moreover, depending on local performances and networking capability, the system allow to drop frames in order to follow the interaction based on its own capacity. With this technique which is based on the Long polling one, we can provide a nice frame rate and interactivity. Regarding the interactivity, mouse event are used on the image to grab user interaction so we can rotate, zoom in and out as well as panning. Moreover, some additional event type have be added to support multi-touch action generated by iPhone or iPad device for rotation and zooming.


