VTK/Configure and Build: Difference between revisions

From KitwarePublic
< VTK
Jump to navigationJump to search
No edit summary
 
(2 intermediate revisions by 2 users not shown)
Line 3: Line 3:
{{Welcome}}
{{Welcome}}


'''<font color="green">This page is applicable for VTK 6.0 and above. For earlier versions, refer to a deprecated version of this document. </font>'''
'''<font color="green">This page is only applicable to VTK 6, 7, and 8. More recent build instructions can be found at [https://gitlab.kitware.com/vtk/vtk/-/blob/master/Documentation/dev/build.md build.md]</font>'''


This page describes how to configure and build VTK, with several popular options turned on.
Line 79: Line 79:
<div style="clear: right; text-align: left; float: right; padding: .4em .9em .9em">
====On Windows====
====On Windows====
To build CMake on windows, a previous version of CMake is required. This can be downloaded from the [CMake Download Page http://www.cmake.org/HTML/Download.html].
To build CMake on windows, a previous version of CMake is required. This can be downloaded from the [http://www.cmake.org/HTML/Download.html CMake Download Page].


</div>
</div>
Line 215: Line 215:
  cmake -DQT_QMAKE_EXECUTABLE:PATH&#x3d;/path/to/qt-4.8.6-build/qt-everywhere-opensource-src-4.8.6/bin/qmake \
  cmake -DQT_QMAKE_EXECUTABLE:PATH&#x3d;/path/to/qt-4.8.6-build/qt-everywhere-opensource-src-4.8.6/bin/qmake \
       -DVTK_Group_Qt:BOOL&#x3d;ON \
       -DVTK_Group_Qt:BOOL&#x3d;ON \
       -DBUILD_SHARED_LIBRARIES:BOOL&#x3d;ON \
       -DBUILD_SHARED_LIBS:BOOL&#x3d;ON \
       /path/to/VTK
       /path/to/VTK
}}
}}

Latest revision as of 18:44, 25 August 2021

Introduction

Hello! Welcome to the wiki.

This page is only applicable to VTK 6, 7, and 8. More recent build instructions can be found at build.md

This page describes how to configure and build VTK, with several popular options turned on.

Prerequisites

  • The VTK build process requires CMake version 2.8.8 or higher and a working compiler. On Unix-like operating systems, it also requires Make, while on Windows we recommend Visual Studio (8 or later).
  • Building VTK with Qt is a common use case for the creation of nice user interfaces. Using Qt 4.8.* is recommended, but earlier versions and Qt 5.* are in various stages of support. Visit the Qt download page to get a copy of the source code or installer. Either the LGPL or commercial versions of Qt may be used.

Download And Install CMake

CMake is a tool that makes cross-platform building simple. If CMake does not exist on the system, and there are no pre-compiled binaries, use the instructions below on how to build it. Use the most recent source or binary version of CMake from the CMake web site.

Using Binaries

There are several precompiled binaries available at the CMake download page.

On Unix-like operating systems

Let's say on Linux, download the appropriate version and follow these instructions:

cd $HOME
wget http://www.cmake.org/files/v2.8/cmake-2.8.12.2-Linux-i386.tar.gz
mkdir software
cd software
tar xvfz ../cmake-2.8.12.2-Linux-i386.tar.gz
  • Now you have the directory $HOME/software/cmake-2.8.12.2-Linux-i386/bin, and inside there are executables cmake and ccmake.
  • You can also install CMake in the /usr/local or /opt by untarring and copying sub-directories. The rest of the instructions will assume the executables are in your $PATH.

On Windows

On Windows, if you are not administrator

Build Your Own CMake

On Unix-like operating systems

Download the source code: http://www.cmake.org/files/v2.8/cmake-2.8.12.2.tar.gz

cd $HOME
wget http://www.cmake.org/files/v2.8/cmake-2.8.12.2.tar.gz
tar xzf cmake-2.8.12.2.tar.gz
cd cmake-2.8.12.2
./configure --prefix=$HOME/software
make
make install
  • Again, you can install it in /usr/local or /opt by changing the prefix.

On Windows

To build CMake on windows, a previous version of CMake is required. This can be downloaded from the CMake Download Page.

Download VTK Source code

Download a Release

Download a VTK release from the VTK Downloads page.

Checkout the VTK Repository with Git

If you want the nightly updates of VTK, this is your best bet. Checking out from source control also greatly facilitates the process of contributing back. Note that you may need to download and install a git client.

Tip: Check out the VTK Git landing page.

On Unix-like operating systems

Prepare directory for download
 # mkdir $HOME/projects
 # cd $HOME/projects

To download the source code 
 # git clone git://vtk.org/VTK.git
 # cd VTK
 
To update the code
 # git fetch origin
 # git rebase origin/master

On Windows

We recommend msysgit. msysgit provides an msys shell that has the appropriate environment set up for using git and its tools.

Configure VTK with CMake

  • Always use a separate build directory. Do not build in the source directory.

On Unix-like systems

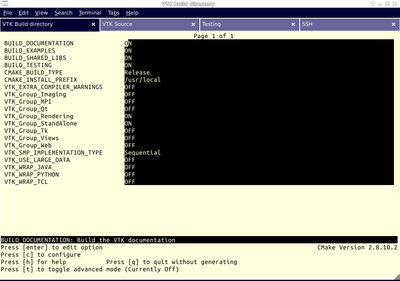
  • Use ccmake (Curses CMake GUI) from the CMake installed location. CCMake is a Curses based GUI for CMake. To run it go to the build directory and specify the VTK source directory as an argument.
mkdir $HOME/projects/VTK-build
cd $HOME/projects/VTK-build

ccmake $HOME/projects/VTK

Vtk-ccmake.png

About CCMake (Curses CMake GUI)

  • Iterative process.
    • Select values, run configure (c key).
    • Set the settings, run configure, set the settings, run configure, etc.
  • Repeat until all values are set and the generate option is available (g key).
  • Some variables (advanced variables) are not visible right away.
  • To see advanced varables, toggle to advanced mode (t key).
  • To set a variable, move the cursor to the variable and press enter.
    • If it is a boolean (ON/OFF) it will flip the value.
    • If it is string or file, it will allow editing of the string.
    • For file and directories, the <tab> key can be used to complete.
  • To search for a variable press '/' key; to repeat the search, press the 'n' key.

On Windows

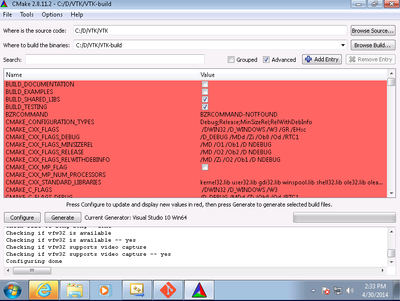
  • Start CMake from the Start menu
  • Make sure to select the appropriate source and the build directory.
  • Also, make sure to pick the appropriate generator. Some CMake versions will ask you to select the generator the first time you press Configure instead of having a drop-down menu in the main dialog.

Vtk-cmake-gui.png

Tip: Uncheck BUILD_EXAMPLES and BUILD_TESTING to speed up the process significantly, if testing and examples are not important to you.

About CMake GUI

  • Iterative process.
    • Select values, press the Configure button.
    • Set the settings, run configure, set the settings, run configure, etc.
  • Repeat until all values are set and the OK button becomes available.
  • Some variables (advanced variables) are not visible right away.
  • To see advanced varables, toggle to advanced mode ("Show Advanced Values" toggle).
  • To set the value of a variable, click on that value.
    • If it is boolean (ON/OFF), a drop-down menu will appear for changing the value.
    • If it is file or directory, an ellipsis button will appear ("...") on the far right of the entry. Clicking this button will bring up the file or directory selection dialog.
    • If it is a string, it will become an editable string.

VTK Settings

Variable Description
BUILD_SHARED_LIBS If ON, use shared libraries. This way executables are smaller, but you have to make sure the shared libraries are available wherever your VTK based application runs.
BUILD_TESTING If ON, build the tests for submission to dashboards, or just run them locally with ctest -A
CMAKE_BUILD_TYPE Should be Release or Debug. If Debug, build with debug symbols. This will run more slowly, but will be more useful if you plan to use a debugger.
CMAKE_INSTALL_PREFIX Specifies where make should put the libraries when the make install command is run.
TODO Put the rest of the prominent variables here
QT_QMAKE_EXECUTABLE Path to Qt's qmake executable (such as /usr/local/bin/qmake). CMake uses this to locate the rest of the required Qt executables, headers and libraries.

Configure with Qt

Note: This step is not absolutely necessary, but useful for anyone hoping to integrate VTK with Qt for a pretty graphical user interface. Depending on your platform and the desired Qt version, this can be a somewhat arduous process, especially if you need to build Qt from source. We recommend using Qt installers along the way whenever possible.


Qt 4.8.*

These notes should also work for 4.7.*, but we recommend using the latest 4.8.* release.

On Unix-like Operating Systems

The latest patch release (Qt4.8.6) does not appear to have an installer for linux on the Qt Downloads page so the code must be built from source.

mkdir qt-4.8.6-build && cd qt-4.8.6-build
wget http://download.qt-project.org/official_releases/qt/4.8/4.8.6/qt-everywhere-opensource-src-4.8.6.tar.gz
tar xzf qt-everywhere-opensource-src-4.8.6.tar.gz
cd qt-everywhere-opensource-src-4.8.6
./configure # go through the dialogue 
make -j<# of cores>
  • Then in the VTK build directory, configure VTK with the path to the Qt build
cmake -DQT_QMAKE_EXECUTABLE:PATH=/path/to/qt-4.8.6-build/qt-everywhere-opensource-src-4.8.6/bin/qmake \
      -DVTK_Group_Qt:BOOL=ON \
      -DBUILD_SHARED_LIBS:BOOL=ON \
      /path/to/VTK
On Microsoft Windows Systems

There is an installer for Qt4.8.6 on Windows.

Download whichever installer you need, and install into a directory. When configuring, set the following variables

VTK_Group_Qt:BOOL=ON (or checked)
QT_QMAKE_EXECUTABLE:FILEPATH=C:\path\to\qt-4.8.6-install\bin\qmake.exe
Configure and generate like normal, and then open up Visual Studio and build the VTK.sln project.

Qt5.*

Warning: This has only been tested on Qt5.2.1, and only on a few systems. Please consider updating this document or emailing the maintainer with issues and fixes.

Qt 5 comes with a few enhancements, among these the modularization of the code base, and the movement of all QWidget functionality into its own library. Qt5 also significantly improves the ease with which one can develop a custom interface. Users of Mac OS X will find better compiler support for the newer SDK's as well.

On Unix-like Operating Systems

There is an installer for Qt5.2.1 on Linux

mkdir qt5.2.1-install && cd qt5.2.1-install
wget http://download.qt-project.org/official_releases/qt/5.2/5.2.1/qt-opensource-linux-x64-5.2.1.run
chmod +x qt-opensource-linux-x64-5.2.1.run
./qt-opensource-linux-x64-5.2.1.run
  • Install to a separate directory
  • Configure VTK with the following variables set:
Note: Every time you see cmake commands given as a single command like this, you can set them using the ccmake curses interface as well
cd /path/to/VTK-Release-qt5.2.1-build
cmake -DVTK_QT_VERSION:STRING=5 \
     -DQT_QMAKE_EXECUTABLE:PATH=/path/to/qt5.2.1-install/5.2.1/gcc_64/bin/qmake \
     -DVTK_Group_Qt:BOOL=ON \
     -DCMAKE_PREFIX_PATH:PATH=/path/to/qt.5.2.1-install/5.2.1/gcc_64/lib/cmake  \
     -DBUILD_SHARED_LIBS:BOOL=ON
     /path/to/VTK
On Microsoft Windows Systems

Choose an appropriate installer:

VS2012
VS2010
MinGW

Run through the installer, and install into a separate directory from where you plan to build VTK.

Warning: We strongly recommend not using spaces in the directory names of source, build, or install directories

Configure with cmake as before with cmake-gui. After the first configuration, set the following variables:

VTK_Group_Qt:BOOL=ON
QT_QMAKE_EXECUTABLE:PATH=C:/path/to/qt-5.2.1-install/5.2.1/msvc2010/bin/qmake.exe

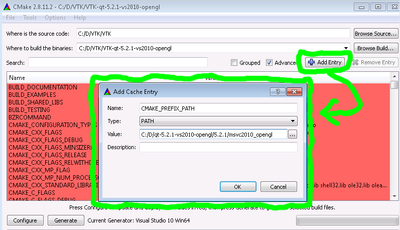
Next, use the "Add Entry" button to create the CMAKE_PREFIX_PATH variable, and set it to the C:/path/to/qt-5.2.1-install/5.2.1/<your_compiler> directory

Cmake-add-cache-entry-arrow.png

Note: Try to make path lengths as short as possible. Windows doesn't support path lengths longer than 260 characters.

Build VTK

After a successful configuration, it's time to build VTK.

Tip: CMake generates the build files in a manner which makes it easy to use all processing cores on your machine. See the Kitware blog CMake: Building with all your cores.

On Unix-like operating systems

Change into your designated build directory. There should be a file named Makefile. These make files have all dependencies and all rules to build VTK on this system.

Warning: Do not try to move the build directory to another location on this system or to another system. The relevant paths are now hardcoded into the makefiles.

Once you have Makefiles, you should be able to just type make in the build directory

 cd /path/to/VTK-build
 make
  • If you are on multi-processor system (let's say four processor), you can type:
 make -j4

On Windows

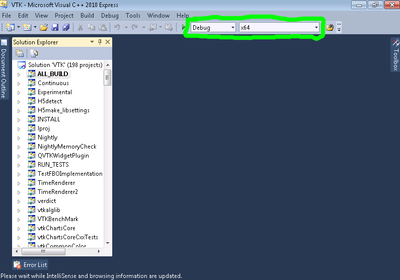
CMake will now create Visual Studio project files. You should now be able to open the VTK project (or workspace) file. Make sure to select the appropriate build type (Debug, Release, ...). To build VTK, simply build the ALL_BUILD target. Vtk-msvc2010-annotation.png