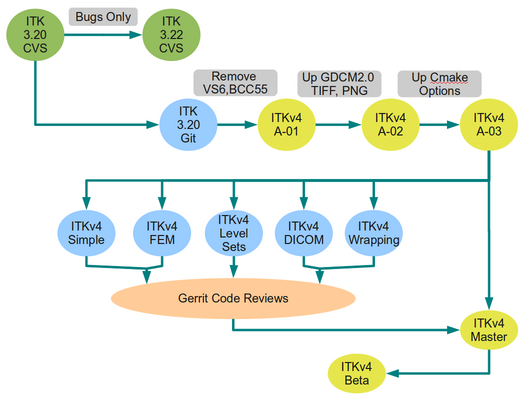
ITK/Gerrit: Difference between revisions
(Little more detail, made the user more generic.) |
(Added details about updating a commit in Gerrit) |
||
| Line 46: | Line 46: | ||
Each of the commits listed by git log will then show up as a commit, optionally labeled with topic-name, in the Gerrit web interface. These commits can then be reviewed and integrated. | Each of the commits listed by git log will then show up as a commit, optionally labeled with topic-name, in the Gerrit web interface. These commits can then be reviewed and integrated. | ||
== Making Changes in Uploaded Patches == | |||
If your change requires revision before it is accepted, you will first need to correct the commit in the topic branch, and then find the change number (in the Gerrit URL for the commit), and the change-id in Gerrit to upload the revised patch. The change-id can be automatically added to your commits, or you can manually add it after the fact. | |||
git rebase -i HEAD~2 | |||
An editor will open, see [http://book.git-scm.com/4_interactive_rebasing.html here for details on interactive rebasing]. Once you have edited the relevant commit, you will need to add the Change-Id (starts with an I in the commit page) as the last line in the commit message, | |||
Change-Id:[change id from Gerrit here] | |||
You can then push the corrected commit(s) to Gerrit, using the change number you found in the interface too, | |||
git push gerrit [new updated commit hash]:refs/changes/[change number] | |||
This updated patch will be shown in the interface as patch set 2. | |||
Revision as of 14:18, 24 August 2010
Code Review System
Overview
- Gerrit is a system for code reviews
- http://code.google.com/p/gerrit/
- It has a built-in Git implementation
Installation
The ITK Gerrit system is available at
In order to register you need to get an OpenID
Workflow
Workflow Example, from Android
Integration with Git
Add Gerrit as one of your remotes
You will want to add Gerrit as a remote, using the username you selected in the Gerrit web interface,
git remote add gerrit USERNAME@review.source.kitware.com:ITK
Gerrit allows you to select a username, and to upload your public SSH key(s).
How to push to Gerrit
When on your topic branch, to view the commits that will be pushed as changes,
  git fetch gerrit
  git log gerrit/master..
Then, when you have a topic branch ready to go,
git push gerrit HEAD:refs/for/master/topic-name
Each of the commits listed by git log will then show up as a commit, optionally labeled with topic-name, in the Gerrit web interface. These commits can then be reviewed and integrated.
Making Changes in Uploaded Patches
If your change requires revision before it is accepted, you will first need to correct the commit in the topic branch, and then find the change number (in the Gerrit URL for the commit), and the change-id in Gerrit to upload the revised patch. The change-id can be automatically added to your commits, or you can manually add it after the fact.
git rebase -i HEAD~2
An editor will open, see here for details on interactive rebasing. Once you have edited the relevant commit, you will need to add the Change-Id (starts with an I in the commit page) as the last line in the commit message,
Change-Id:[change id from Gerrit here]
You can then push the corrected commit(s) to Gerrit, using the change number you found in the interface too,
git push gerrit [new updated commit hash]:refs/changes/[change number]
This updated patch will be shown in the interface as patch set 2.
