Batchmake slicer: Difference between revisions
| Line 85: | Line 85: | ||
* Click on <b>Apply</b>. | * Click on <b>Apply</b>. | ||
===How to vary | ===How to vary parameters ?=== | ||
As we have seen in the previous section <b>Module Configuration</b>, it is possible to vary the parameters values. The default varying parameters in Register Images BatchMake module are the <b>Rigid</b>, <b>Affine</b> and <b>BSpline Max Iterations</b> parameters, but you can change RegisterImagesBatchMakeModule.xml to have more varying parameters. RegisterImagesBatchMakeModule.xml can be found in <i>Slicer3/Applications/CLI/BatchMakeApplications/RegisterImagesBatchMakeModule</i>". The variation mechanism works by adding a min, a max and a step suffix to a scalar parameter: | As we have seen in the previous section <b>Module Configuration</b>, it is possible to vary the parameters values. The default varying parameters in Register Images BatchMake module are the <b>Rigid</b>, <b>Affine</b> and <b>BSpline Max Iterations</b> parameters, but you can change RegisterImagesBatchMakeModule.xml to have more varying parameters. RegisterImagesBatchMakeModule.xml can be found in <i>Slicer3/Applications/CLI/BatchMakeApplications/RegisterImagesBatchMakeModule</i>". The variation mechanism works by adding a min, a max and a step suffix to a scalar parameter: | ||
{| | {| | ||
Revision as of 15:49, 12 May 2009
BatchMake in Slicer
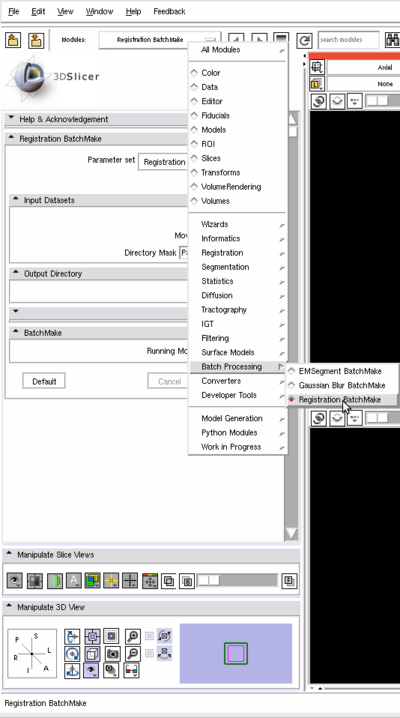
BatchMake has been integrated in Slicer since version 3, then highly improved in version 3.4. The Batch Processing category can be found in the Slicer modules list.
There are 4 modules into the Batch Processing subsection: Gaussian Blur BatchMake, Register Images BatchMake, EMSegment BatchMake and Resample Scalar Volume BatchMake. Each Batch module internally calla a Slicer module, respectively Gaussian Blur, Register Images, EMSegment Simple and Resample Scalar Volume.
Batch processing allows you to automatically run on multiple machines multiple modules multiple times with multiple parameters on multiple inputs.
Since Slicer 3.4, you can easily transform any Slicer modules to support batch processing. Only minor changes in the module XML file is needed, no code has to be written specifically for a Batch module.
In this tutorial we will introduce you with BatchMake in Slicer and guide you step by step to batch process your data. We will then explain how you can create your own BatchMake module based on a Slicer module.
How to run a BatchMake module locally?
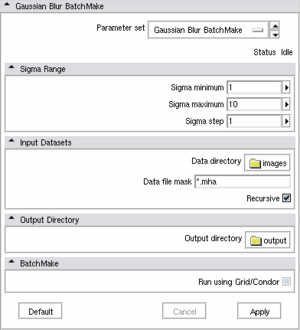
In this section, we will see how to run on a local machine a Gaussian Blur filter. For a single input, multiple output will be generated, one for each sigma value.
- Launch Slicer
- Open the "Gaussian Blur BatchMake" module located in "Batch Processing"
- Set Sigma Minimum, Sigma Maximum and Sigma Step, it changes the number of times the Gaussian Blur module will be called with a different sigma. If Sigma minimum, maximum and step are respectively set to 1, 10 and 1; Gaussian Blur will be run 10 times, with a sigma varying from 1 to 10.
- Then select a directory for Data directory. The directory shall contains the input images to blur.
- Define a mask (using wildcards) to select the images to blur based on the filename and/or extension. Each image fitting the mask requirements will be processed separately.
- Check Recursive if you want to recursively apply the "Data file" mask in the "Data directory".
- Select a directory for Output directory. The ( nb_input * (sigma_max - sigma_min) / sigma_step ) result images will be saved in that directory.
- Make sure the checkbox Run using Grid/Condor is unchecked as we want to run the module locally
- Click Apply to launch the processing.
Note: The inputs of the Gaussian Blur filter are the files found in the input directory. If Sigma minimum, Sigma maximum and Sigma step are respectively set to 1, 10 and 1, then 10 files will be created for each input file. For example, if 3 files in the input directory
imageX.mha, imageY.mha and imageZ.mha
match the Data file mask, (for example all three matching *.mha); then the output directory will contain after the module is executed :
imageX-1.mha, imageX-2.mha ... imageX-10.mha,
imageY-1.mha, imageY-2.mha ... imageY-10.mha,
imageZ-1.mha, imageZ-2.mha ... imageZ-10.mha
How to run Register Images on a Condor grid
In this section, we will see how to register multiple moving images with a single fixed image. The computation will be done on several machines using Condor. Condor must be already installed on your machine(s) and work properly. You must have created and configured a condor user account on your machine, the condor scripts generated by BatchMake will be executed by the condor user ( +Owner = condor ). For the example, we used the following file/folder hierarchy:
/...
  /project
    /RegisterImagesInput
      /Fixed
        /Normal001-T2-resampled.mha
      /Moving
        /Normal002-T2-resampled.mha
        /Normal003-T2-resampled.mha
        /...
        /Normal100-T2-resampled.mha
    /RegisterImagesOutput
    /RegisterImagesScripts
  /applications
    /RegisterImages -> /home/user/Slicer3-build/lib/Slicer3/Plugins/RegisterImages
    /bmGridSend ->/home/user/Slicer3-lib/BatchMake-build/bin/bmGridSend
    /bmGridStore ->/home/user/Slicer3-lib/BatchMake-build/bin/bmGridStore
    /bmSliceExtractor ->/home/user/Slicer3-lib/BatchMake-build/bin/bmSliceExtractor
    /...
Module configuration
- Start Slicer ( as a regular user, there is no need to be a condor user ).
- Open the Register Images BatchMake module located in Batch Processing
- In the IO section, select an input Fixed Image file. All the moving image will be registered with it.
- Then select a directory for Moving Image Directory. The moving images can be in its subdirectories.
- Select a mask to filter the moving images from the Moving Image Directory. If the moving images are in sub-directories, the mask shall be a relative path. The sub-directories can be wildcarded as well as the file names( i.e. "Patient*/Image*.mha")
- Select an output directory for Resample Image where the output images will be saved.
- A mask describes how to generate the filename of the output images based on the input parameters. The XML variable names can be used by enclosing their name into a dollar sign and braces, i.e. "Registered-${rigidMaxIterations}-${fixedImage}".
- Fill the parameters of the next module sections: Registration, Advanced Registration, Registration Testing... .
- The Advanced Rigid, Affine and BSpline Registration parameters use a min/max/step mechanism. This allow you to automatically vary the module parameters. By defining a min, max and step inputs for a single parameter (Max Iterations), the Register Image module will be run (max-min)/step times for each inputs with a different Rigid (or Affine or BSpline) Max Iterations value. Please note that ${rigidMaxIterations} must be in the Resample Image mask in order to generate unique output file names at each step. We will see in a next section, how the module parameters can be modified in the XML file to automatically support an iteration over the parameter.
Condor configuration
Once all the module parameters are set up, the BatchMake section must be configured.
- Check the condor box for the running mode.
- Select a directory for Grid Input directory. If the option Transfer file is set to NONE (recommended), the selected grid input directory must exist and be accessible by all the condor machines. The directory can be local or on the network. The Grid Input directory is the root directory for all the required input files of the module. For the Register Images module, it's the root directory of the Fixed Image AND the Moving Images. Here, Grid Input directory has the value of "/.../project/RegisterImagesInput".
- Select an output directory for Grid Output directory. It is the root directory for all the generated files by the module. It must have the write rights for all the condor machines. In our example, Grid Output directory has the same value than Resample Image Directory, "/.../project/RegisterImagesOutput".
- Select a directory for Grid Executable directory, it is a directory where all the applications are. It must be the same for all the condor machines. Applications can be symbolic links (recommended). The value given in our example is "/.../applications".
- Grid Working directory is a directory where all the files (bmcondor.??.bmc.tmp, bmcondor.bmc.tmp.dagman.out, bmGrid.out.txt...) generated by condor are stored. These files are useful for debugging.
- Transfer Files shall be set to None. However, for condor experts, it can be set to transfer some of the needed files.
- Click on Apply.
How to vary parameters ?
As we have seen in the previous section Module Configuration, it is possible to vary the parameters values. The default varying parameters in Register Images BatchMake module are the Rigid, Affine and BSpline Max Iterations parameters, but you can change RegisterImagesBatchMakeModule.xml to have more varying parameters. RegisterImagesBatchMakeModule.xml can be found in Slicer3/Applications/CLI/BatchMakeApplications/RegisterImagesBatchMakeModule". The variation mechanism works by adding a min, a max and a step suffix to a scalar parameter:
| Static parameter | Varying parameter |
|---|---|
<integer> <name>rigidMaxIterations</name> <description>Maximum number of rigid optimization iterations</description> <label>Rigid Max Iterations</label> <longflag>rigidMaxIterations</longflag> <default>100</default> </integer> |
<integer> <name>rigidMaxIterations_Min</name> <description>Maximum number of rigid optimization iterations</description> <label>Rigid Max Iterations (min)</label> <longflag>rigidMaxIterations_Min</longflag> <default>100</default> </integer> <integer> <name>rigidMaxIterations_Max</name> <description>Maximum number of rigid optimization iterations</description> <label>Rigid Max Iterations (max)</label> <longflag>rigidMaxIterations_Max</longflag> <default>100</default> </integer> <integer> <name>rigidMaxIterations_Step</name> <description>Maximum number of rigid optimization iterations</description> <label>Rigid Max Iterations (step)</label> <longflag>rigidMaxIterations_Step</longflag> <default>50</default> </integer> |
How to write your own Batch Processing module ?
The BatchMake modules running on Condor don't support the <image> tags in the module XML files. Slicer pass <image> arguments to the modules the memory address where the image is loaded and not the filename of the image. as <im they must be changed into <file> or <directory>+<string>. Share


