Animation View: Difference between revisions
| Line 26: | Line 26: | ||
Say the sphere source we want to animate is called "Sphere1" in the pipeline browser. Now to add an animation track to animate the radius of this sphere, select the '''Sphere1''' in the ''Object'' combo-box and then select '''Radius''' in the ''Parameter'' combo-box. Then hit the [[Image:AddTrackButton.png]] to add the animation track for Sphere1's Radius. Once the track is added it will be shown in the '''Animated Parameters''' section. Now, we need to change the radius value to go from 0.1 to 1. So, simply double click on the track, the '''Animation Keyframes''' editor dialog will pop-up (Figure 2). ParaView tries to initialize new animation tracks with some default values, hence this track has been initialized to animate the raduis from 0 to 0.5. To change any parameter, simply double-click on any column and enter the new values. | Say the sphere source we want to animate is called "Sphere1" in the pipeline browser. Now to add an animation track to animate the radius of this sphere, select the '''Sphere1''' in the ''Object'' combo-box and then select '''Radius''' in the ''Parameter'' combo-box. Then hit the [[Image:AddTrackButton.png]] to add the animation track for Sphere1's Radius. Once the track is added it will be shown in the '''Animated Parameters''' section. Now, we need to change the radius value to go from 0.1 to 1. So, simply double click on the track, the '''Animation Keyframes''' editor dialog will pop-up (Figure 2). ParaView tries to initialize new animation tracks with some default values, hence this track has been initialized to animate the raduis from 0 to 0.5. To change any parameter, simply double-click on any column and enter the new values. | ||
ParaView's animation engine is key-frame based. Hence one can add more than two keyframes, change the interpolation function for the value between two keyframes etc. using this dialog. Double-clicking on the '''Interpolation''' column will show the available interpolation functions for the given parameter type. Note that there's no interpolation function for the last key-frame since interpolation is defined between two keyframes. | ParaView's animation engine is key-frame based. Hence one can add more than two keyframes, change the interpolation function for the value between two keyframes etc. using this dialog. Double-clicking on the '''Interpolation''' column will show the available interpolation functions for the given parameter type. Note that there's no interpolation function for the last key-frame since interpolation is defined between two keyframes. | ||
To remove an animation track, simply hit the [[Image:RemoveTrackButton.png]] next to that animation track. | |||
{{ParaView/Template/Footer}} | {{ParaView/Template/Footer}} | ||
Revision as of 18:29, 15 September 2008
Animation View is used to set up animations in ParaView. It's is accessible through View | Animation View. This article describes this view and how to use it to create simple animations.
The Animation View is intended to be a replacement for the Animation Inspector in ParaView 3.0. The Animation Inspector will be deprecated in future versions.
User Interface
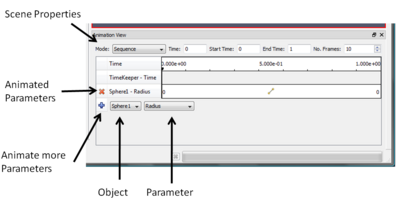
Figure 1 shows the the animation view. It is a standard dockable widget. There are three major portions to this panel:
- Scene Properties:
- Show/Edit properties associated with the scene which affect the playback/saving animation.
- Animated Parameters:
- Shows the animation tracks for each of the filter/source/camera paramters being animated in this setup.
- Animate more Paramaters:
- Provides means to add animation tracks for other available parameters.
Use Cases
We will now see a few use-cases which will illustrate the use of this panel and each of its components.
Animate Parameters
One of the simplest animation set up is where the user wants to change a parameter on a filter or source through the course of the animation. Consider the simplest case, we have a sphere source and we want to create an animation where the radius of the sphere goes from 0.1 to 1.
Say the sphere source we want to animate is called "Sphere1" in the pipeline browser. Now to add an animation track to animate the radius of this sphere, select the Sphere1 in the Object combo-box and then select Radius in the Parameter combo-box. Then hit the
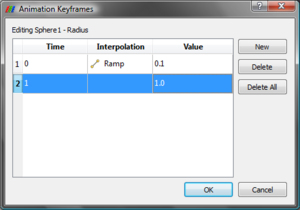
to add the animation track for Sphere1's Radius. Once the track is added it will be shown in the Animated Parameters section. Now, we need to change the radius value to go from 0.1 to 1. So, simply double click on the track, the Animation Keyframes editor dialog will pop-up (Figure 2). ParaView tries to initialize new animation tracks with some default values, hence this track has been initialized to animate the raduis from 0 to 0.5. To change any parameter, simply double-click on any column and enter the new values.
ParaView's animation engine is key-frame based. Hence one can add more than two keyframes, change the interpolation function for the value between two keyframes etc. using this dialog. Double-clicking on the Interpolation column will show the available interpolation functions for the given parameter type. Note that there's no interpolation function for the last key-frame since interpolation is defined between two keyframes.
To remove an animation track, simply hit the
next to that animation track.

