VTK/Building/Windows: Difference between revisions
Daviddoria (talk | contribs) (→Building VTK CVS on Win32: removed references to CVS directory. Abstracted version number of CMake. Explained not to use the VTK exe download.) |
No edit summary |
||
| Line 1: | Line 1: | ||
== Building VTK on | == Building VTK on Windows using Visual Studio (from a zip/tar file) == | ||
Note: VTK uses the standard approach for building CMake based projects on Windows. If you are familiar with building projects on Windows using CMake then you can use your normal process. For information on other options such as msys, nmake, etc see the documentation associated with CMake. | |||
=== Step 1 - Download VTK=== | === Step 1 - Download VTK=== | ||
| Line 10: | Line 10: | ||
=== Step 2 - Download CMake === | === Step 2 - Download CMake === | ||
[http://cmake.org/HTML/Download.html Download CMake]. Choose the windows installer (cmake-x.y.z-win32.exe) and install it. | [http://cmake.org/HTML/Download.html Download CMake]. Choose the windows installer (cmake-x.y.z-win32.exe) and install it. Letting the cmake installer add itself to your patch will make it easier but is not required. | ||
=== Step 3 - Create a build folder === | === Step 3 - Create a build folder === | ||
| Line 17: | Line 17: | ||
C:\MyProjects\VTK-bin | C:\MyProjects\VTK-bin | ||
This will store the compiled binaries | This is where we will store the compiled binaries | ||
=== Step 4 - Run CMake === | === Step 4 - Run CMake === | ||
| Line 28: | Line 28: | ||
Once you hit 'Configure', make sure to turn on: | Once you hit 'Configure', make sure to turn on: | ||
* BUILD_SHARED_LIBS | * BUILD_SHARED_LIBS | ||
this causes the VTK dlls to be built | this causes the VTK dlls to be built. | ||
=== Step 5 - Open the Visual Studio project=== | === Step 5 - Open the Visual Studio project=== | ||
Start up visual studio and then open the VTK.sln in C:\MyProjects\VTK-bin and build it. | |||
=== Step 6 - | === Step 6 - Install the project === | ||
Installation, the VTK dll will be in | Installation, the VTK dll will be in | ||
| Line 49: | Line 47: | ||
=== Step 7 - Manual building=== | === Step 7 - Manual building=== | ||
When building your project if you don't use CMake, make sure that ''Additional Include Directories'' and ''Additional Library Directories'' (from within the Visual Studio interface) are pointing to the proper path of VTK-src | When building your project if you don't use CMake, make sure that ''Additional Include Directories'' and ''Additional Library Directories'' (from within the Visual Studio interface) are pointing to the proper path of VTK-src | ||
== Installing VTK == | == Installing VTK == | ||
'''NOTE''': | '''NOTE''': | ||
* It is assumed that you have already built VTK. If not refer to previous section on how to build VTK. | * It is assumed that you have already built VTK. If not refer to previous section on how to build VTK. | ||
| Line 63: | Line 60: | ||
# Click Configure | # Click Configure | ||
# Click "OK" | # Click "OK" | ||
# Open Visual Studio, select the VTK.sln | # Open Visual Studio, select the VTK.sln project from the binary directoy. | ||
# Make sure that ALL_BUILD is the selected target. Build it. It should be a noop. | # Make sure that ALL_BUILD is the selected target. Build it. It should be a noop. | ||
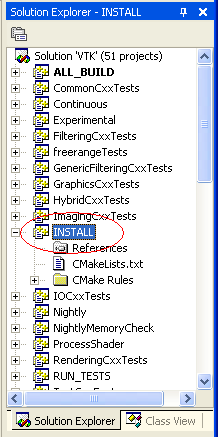
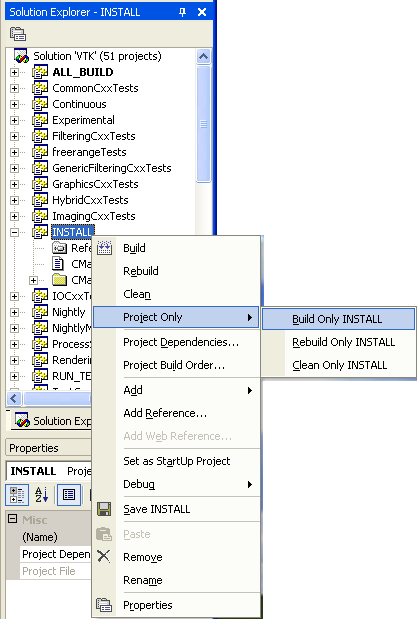
# Once this is done, select the "INSTALL" target. And build this target (eg. Right click on it, then Build this taget only). This will copy and the the correct permission for all the files needed to use VTK in the directory you have specified. | # Once this is done, select the "INSTALL" target. And build this target (eg. Right click on it, then Build this taget only). This will copy and the the correct permission for all the files needed to use VTK in the directory you have specified. | ||
Revision as of 16:24, 3 April 2014
Building VTK on Windows using Visual Studio (from a zip/tar file)
Note: VTK uses the standard approach for building CMake based projects on Windows. If you are familiar with building projects on Windows using CMake then you can use your normal process. For information on other options such as msys, nmake, etc see the documentation associated with CMake.
Step 1 - Download VTK
Download VTK release you want from: [1] and unpack the archive (zip or tar.gz (Do NOT download the exe - this is not the VTK library.) ) into
C:\MyProjects\VTK-src
You will probably want the latest one (highest version number) unless you have a specific reason to use an older one.
Step 2 - Download CMake
Download CMake. Choose the windows installer (cmake-x.y.z-win32.exe) and install it. Letting the cmake installer add itself to your patch will make it easier but is not required.
Step 3 - Create a build folder
Create a folder
C:\MyProjects\VTK-bin
This is where we will store the compiled binaries
Step 4 - Run CMake
Start CMake, provide the source codes and binaries paths to CMake. Then press Configure button to let CMake read the CMakeLists.txt from the source path and configure the variables. In your case you should have:
Where is the source code: C:\MyProjects\VTK-src
Where to build the binaries: C:\MyProjects\VTK-bin
Once you hit 'Configure', make sure to turn on:
* BUILD_SHARED_LIBS
this causes the VTK dlls to be built.
Step 5 - Open the Visual Studio project
Start up visual studio and then open the VTK.sln in C:\MyProjects\VTK-bin and build it.
Step 6 - Install the project
Installation, the VTK dll will be in
C:\MyProjects\VTK-bin\bin\release
therefore by default the system cannot find them. You have the choice in either copying the dll to
c:\windows\system32
or change the environment variable PATH to include the path:
C:\MyProjects\VTK-bin\bin\release
Be very careful if you have multiple VTK installed on your system that you are using the right one. It is strongly suggested that only one version of the VTK dll be on one system.
Step 7 - Manual building
When building your project if you don't use CMake, make sure that Additional Include Directories and Additional Library Directories (from within the Visual Studio interface) are pointing to the proper path of VTK-src
Installing VTK
NOTE:
- It is assumed that you have already built VTK. If not refer to previous section on how to build VTK.
Steps:
- Start CMake (CMakeSetup.exe).
- Configure VTK (select the correct binary directory in "Where to build the binaries").
- Select the proper path for "CMAKE_INSTALL_PREFIX". It should be something like : "C:/MY INSTALLATION/VTK"
- Click Configure
- Click "OK"
- Open Visual Studio, select the VTK.sln project from the binary directoy.
- Make sure that ALL_BUILD is the selected target. Build it. It should be a noop.
- Once this is done, select the "INSTALL" target. And build this target (eg. Right click on it, then Build this taget only). This will copy and the the correct permission for all the files needed to use VTK in the directory you have specified.

